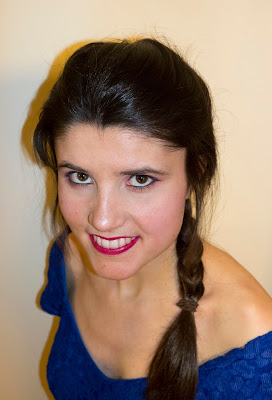
I got my hair cut a couple of weeks ago and my hairdresser asked me if I wanted it any shorter than usual. I instantly replied saying no and that I like it this length, and she said to me: ‘Is that so you can have Elsa hair?’. I laughed, but I guess it’s kind of true; I love getting to have my hair in a side plait like the Frozen Queen. So that’s how I got the idea for today’s post: my everyday Elsa hair and make up tutorial.
The Outfit
Now the whole point of this look is that you still get to wear your everyday clothes, so if you have a blue or sparkly dress, that’d be the perfect way to start. I opted for an off-the-shoulder lace blue one from Dorothy Perkins.
The Hair
Now for the world-famous plait. Pull the front of your hair back into a rough, slightly raised quiff. Then use this height and plait your hair back, making sure you leave a little bit of hair loose at the front either side. Doing this allows the hair to still shape around your face and the style to be more organic; Elsa’s plait is quite natural after all. Keep the plait going until it goes over your left shoulder. A clear hair tie would be great at this point, unfortunately I didn’t have one, but one the same colour as your own hair also works.
The Make-up
Skin
When I’m doing my make-up, I use a mix of drugstore brands, Benefit and the occasional Estée Lauder higher-end product. My skin is really sensitive to foundation so I tend to use limited coverage, and that’s exactly what I did for this look. I used my Benefit Boi-ing for dark circles and breakouts, and then my Rimmel Natural Bronzer. For blusher, I used Bourgois’ blush in number 48: Ashes of Roses. I also used a bit of Benefit’s ‘High Beam’ on the bridge of my nose and my cheek bones, to give the look a Princess-style glow.
Eyes
For eyes, I needed a bold pink eyeshadow and a precise eyeliner. The shadow I used was Rimmel’s deep pink shade in the 024 Pinkadilly Circus Glam’eyes palette. Elsa is known for her vibrant pink eyeshadow, so you’ll want to find one with popping colour. For eyeliner, I used my L’Oreal Ultra Precision Super Liner in black, and this was perfect for the Elsa wing! For my waterline, I used my Natural Collection Black liner. I can’t stress enough how important eyeliner is for this look- Elsa’s eyes are so clearly defined. Now for mascara I used Estée Lauder’s Sumptuous Bold Volume Lifting Mascara in black. It’s the perfect size for travelling, without compromising the brush size at all. I’m amazed by the extension you get from this mascara and it’s perfect for this tutorial, providing you with the long lashes you need for creating Elsa’s look.
Lips
Last of all it’s lips, and again you need a deep pink. I used a combination of two Rimmel products: Kate Moss’ No. 30 lipstick and one of the Color Rush Balms in ‘210 Boom Chic a Boom’.
So there you go, that’s how I create my everyday Queen Elsa look.
I hope you like it!
Are there any other everyday Disney character looks you’d like to see?
Thanks for reading my blog.
Love Mouse Chick ♡


Comments